Amazon recently released the AWS IoT Button as a one-click button that allows you to do “IoT related tasks.” Seeing that I work at an “IoT related” company, and work out of the Think Big Coworking space, an AWS IoT button to do something around the office was a must.
We weren’t entirely sure what to do with the AWS IoT buttons we had, but after some thought and a few Slack messages about the coffee being out on the different floors, it seemed obvious. The button should message our community-connector that coffee is needed on the floor.
Slack is a huge part of the community at Think Big Coworking. It’s a great way to stay up to date with what is happening in the building, as well as communicate with other members. This is why we think a button that ties into Slack, is the perfect use-case for our space. Everyone is always on Slack, and who doesn’t like fresh coffee?
Follow this guide, and within 30-minutes you’ll be sending Slack messages to a channel of your choosing.
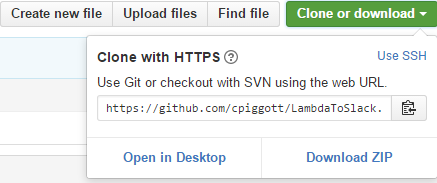
If you downloaded it by clicking ‘Download Zip’ you’ll need to extract the files. On Windows, right-click on the file and click ‘Extract all…’ on Mac, double-click on the .zip file in Finder and it should create an extracted version.
Slack Configuration
Next thing you’ll want to do is head over to Slack and create a web-hook for your Slack Team. This requires Admin privileges on Slack.
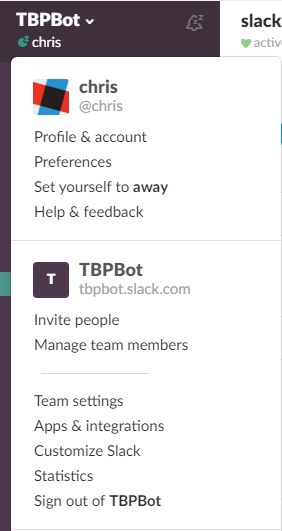
In the Slack application, click the drop-down arrow to the right of your teams name and select ‘Apps & integrations.’
Click Apps & integrations
This will open up the browser with your teams Apps and Integraitons, you’ll need to navigate to the ‘Build’ part of Slack to create a new integration for your channel.
Top right menu of Slack, click Build
You’ll then receive two options: An app for other Slack teams, or Something for just my team. Select “Something just for my team.”
Select Make a Custom Integration
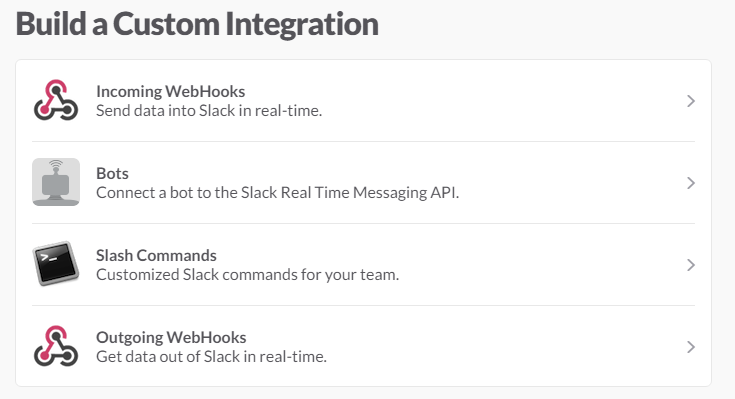
Once you click “Make a Custom Integration,” you’ll be prompted with these options, select “Incoming WebHooks.”
Select Incoming WebHooks
You’ll now be prompted with an option to select a channel that the webhook works for, this part is entirely up to you. We created a new channel that is used specifically for coffee. We called it #coffee and added the webhook, as well as other employees that might need to know to refill the coffee. You can also create webhooks to send as direct messages.
Choose a channel and click Add Incoming WebHooks Integraiton
After selecting your channel and clicking the “Add Incoming WebHooks Integration”, you’ll be sent to the configuration page for the Webhook. This page will look like the image below.
Slack WebHook configuration page.
From this page you can see all of the different settings that you can tweak for your webhook. We decided that since this was a coffee-bot, why not customize the name and icon to have something to do with coffee.
You’ll now need to copy the Webhook URL for use in the next part of the guide. Don’t forget to click Save Settings if you’ve customized the look and name of your integration.
Head over to the files that you extracted and open up the main.py file with your favorite text editor. The code should look like below:
import requests
def handler(event, context):
    requests.post('insert your url between these quotes',json={"text" : "Insert your message between these quotes, slack emotes like :coffee: work in the text body" })
Where it says ‘insert your url between these quotes’ is where you will… well… insert your URL.
Next, customize your message to say whatever you want it to. You can insert different emoji’s within the message, here is an example of what we have:
:three: : Coffee is out on the *3rd floor*. More please! :coffee:
Once you have customized your message and placed it between the quotes for the message part of the code, your final main.py should look something like this:
Once you are finished with the main.py file, save it and close your editor.
AWS Configuration
Next, we need to sign up for an Amazon AWS account. Go to the AWS IoT Button website at https://aws.amazon.com/iot/button/ and you’ll find a button saying “Create an Account”. Go through the process of signing up. This will require a credit card, but the first 1-million calls per month to your code are free, so this isn’t going to cost you anything to run.
After signing up for an AWS account, you now need to head to the AWS Dashboard. At the top of the page, there is a drop-down called “Services”, mouse-over the services tab, and click “Lambda” in the menu.
Select Lambda from the menu.
When you get to the Lambda page, you will be prompted to create a new Lambda Function. The next part of this guide will walk you through what I found to be the trickiest part of this whole process.
Click the “Create a Lambda Function” button on the Lambda services pages. After clicking, you’ll be prompted with pre-built Lambda functions known as Blueprints. At the bottom there is a button to skip this and create your own. Press the Skip button to move on to create a custom Lambda.
I’m going to work on creating a Blueprint for this so you don’t have to mess with the code, but that will come as I find the documentation to create a blueprint. If you know anymore about doing so, please tweet it to me @nullrefexc
Press Skip when you see this page.
At this point, you are prompted with a text editor to write code, we aren’t going to do this, instead we are going to upload the code that we wrote earlier.
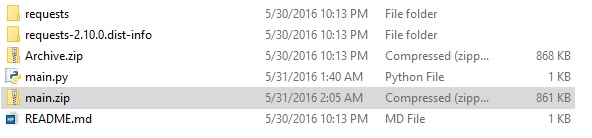
Head back to finder or your file explorer where main.py is currently stored, and we now need to package all the code together to in a .zip file for AWS. This part is confusing in the AWS documentation, so I am documenting it here. DO NOT ZIP THE FILE THAT ALL THE FILES RESIDE IN. We need to zip the contents of the file with only the items we need. These files are:
main.py
requests
requests-2.10.0.dist-info
To select only these three files, hold the Ctrl button on your keyboard, and click on the the three files needed, they should highlight. You will now need to zip them, right click on one of the selected files, and click Send To… and select Compressed file. It will prompt you to change the name of the file, call it whatever you want.
Select these three files.
After compressing, I renamed the file to main.zip
Once we have finished compressing the file, we can head back to AWS to configure our Lambda.
You’ll want to set the configurations to match the following image. The Name and description is up to you, but you will need to select Python 2.7 for the Runtime.
You will also upload the .zip file we just created by clicking the “Upload a .ZIP file” option and then clicking Upload.
Set you configuration to closely match the above.
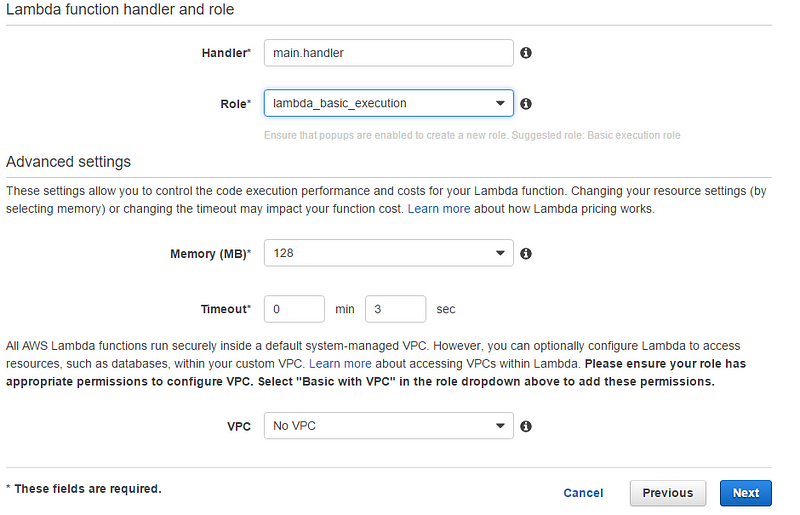
We now need to get into the Lambda function handler/role and Advanced settings. You will need to set the Handler to main.handler.
main.handler represents the piece of code that needs to execute. So we want the handler function in the main.py file to execute here.
What your Handler should look like.
Next we need to select a Role for the code to use. This requires heading to an external page by clicking on an item in the drop-down menu. Click the drop-down menu and select “*Basic execution role.” This should open up a new page, with the Role permissions. Simply click Allow at the bottom of the page that popped up and head back to your Lambda configuration.
Once you have created a Role and selected it, the rest of the configuration should look like the image below. Once it is all set, click Next.
Final settings for Lambda function.
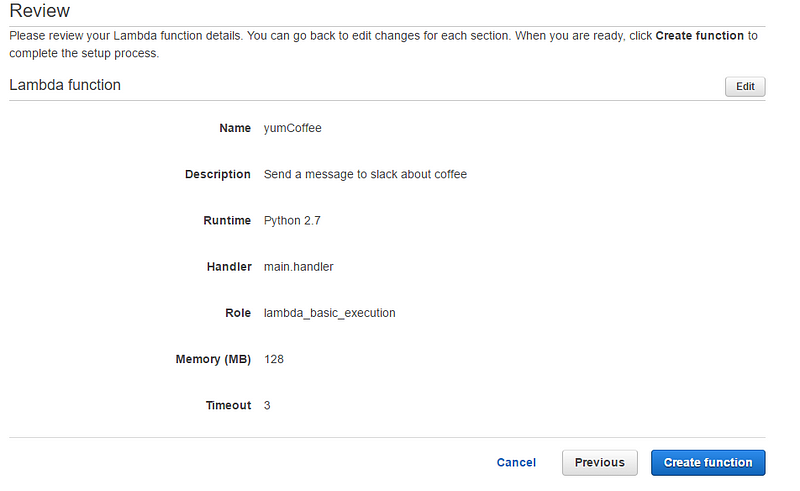
You’ll be prompted with a Review screen to confirm all your settings. If everything looks good, click “Create function.”
Confirm your Lambda Function settings.
You will be kicked back to the functions dashboard now, at the top there is a button to Test you code. You can click that button to confirm that it works.
Click Test
Clicking the Test button for the first time will prompt you to create a test to run, select the Hello World example and click Save and test.
Test Configuration
If everything worked, you should see a message in the Slack channel that you created your webhook for. Here is an example of the message I sent when I clicked Test.
Message sent from “coffee-bot”
Now that our messages are being fired, we need to set-up the last part of this, which is the AWS IoT button.
Head back to your browser and the dashboard for the Lambda function we created. We need to select the “Event sources” tab from the dashboard. Click the “Add event source” and a dialog pops-up. Select AWS IoT and the dialog should bring up more options. Choose the “IoT Button” from the “IoT type”drop-down. This can be seen below.
Enter your IoT serial and you’ll be given instructions on setting up your IoT button.
When you click “Generate certificates and keys” you will be given a set of instructions on how to connect to the IoT button. Makes sure to download the certificate.pem and private.key files before connecting to your IoT buttons.
Follow the directions provided by AWS and follow the guide provided here. Once your device is configured, re-connect to your network, and click Submit. You should receive a green dialog confirming that the button was configured correctly and the light on the AWS IoT button should turn green.
You are now set to use your IoT button as you configured it. We decided to stick ours to a sign and set it next to the coffee dispensers. It’ll be nice to know when a fresh brew is on the way to floor. Check out the sign we made, with emoji’s of course.
Sign next to the coffee dispenser.
Slack messages from clicking the button.
If you have any questions about how to set this up, please feel free to reach out to me on Twitter. Also, I’m interested in what other end up doing with these, could be cool to see.