// 불펌스크립트시작 // 불펌스크립트 끝

제어판 → 프로그램 및 기능 → Windows 기능 켜기/끄기 에서 아래 스크린 샷처럼 .NET Framework 3.5(.NET 2.0 및 3.0 포함)을 활성화하는 식으로 닷넷 3.5를 설치하려고 시도해 봤는데요,


아래 스크린 샷처럼 오류 코드 : 0x800F0906 를 뿜으면서 더이상 진행되지 않아서 설치가 불가능한 증상이 있었습니다.


온라인 상에서 해결해 보려고 애를 써봤지만 잘 안돼서, 윈도우 설치할 때 썼던 ISO파일에 내장된 닷넷 3.5를 설치하는 식으로 해결을 했습니다.


일단 윈도우 ISO 파일을 마운트하거나 설치USB를 꼽고, 해당 드라이브에 sources\sxs 폴더가 있는지 확인합니다. 확인했으면...

화면 좌측하단 시작버튼에서 마우스 우클릭 → 명령프롬프트(관리자) 를 선택합니다. (아래 스샷 참고)


명령프롬프트(관리자) 창에 아래의 명령을 참고하여 입력합니다. 


DISM /Online /Enable-Feature /FeatureName:NetFx3 /All /LimitAccess /Source:e:\sources\sxs

위 명령에서 붉게 표시한 e: 은 윈도우 ISO(혹은 USB)가 마운트된 드라이브 명으로 수정해야 합니다.


조금 기다리면 위 스크린 샷처럼 작업완료 메세지가 뜰겁니다. 그럼 설치가 끝난 겁니다.

제어판 → 프로그램 및 기능 → Windows 기능 켜기/끄기 로 진입해보면 아래 스크린샷처럼 닷넷 3.5가 활성화되어 있는 것을 확인할 수 있을겁니다.


Slack Messaging with the AWS IoT Button

Update: James Hurst has created an incredible Udemy course on doing exactly this, go check it out! It’s FREE!

Udemy Course: https://www.udemy.com/aws-iot-slackbot/learn/v4/overview

Amazon recently released the AWS IoT Button as a one-click button that allows you to do “IoT related tasks.” Seeing that I work at an “IoT related” company, and work out of the Think Big Coworking space, an AWS IoT button to do something around the office was a must.

We weren’t entirely sure what to do with the AWS IoT buttons we had, but after some thought and a few Slack messages about the coffee being out on the different floors, it seemed obvious. The button should message our community-connector that coffee is needed on the floor.

Slack is a huge part of the community at Think Big Coworking. It’s a great way to stay up to date with what is happening in the building, as well as communicate with other members. This is why we think a button that ties into Slack, is the perfect use-case for our space. Everyone is always on Slack, and who doesn’t like fresh coffee?

Follow this guide, and within 30-minutes you’ll be sending Slack messages to a channel of your choosing.

AWS IoT Button

Guide

First thing you’ll want to do is clone or download my GitHub repository located at: https://github.com/cpiggott/LambdaToSlack

You can clone it with the git clone command:

git clone https://github.com/cpiggott/LambdaToSlack.git

or

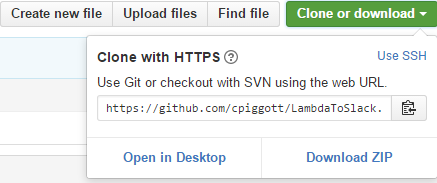
Click Clone or download and Download ZIP

If you downloaded it by clicking ‘Download Zip’ you’ll need to extract the files. On Windows, right-click on the file and click ‘Extract all…’ on Mac, double-click on the .zip file in Finder and it should create an extracted version.

Slack Configuration

Next thing you’ll want to do is head over to Slack and create a web-hook for your Slack Team. This requires Admin privileges on Slack.

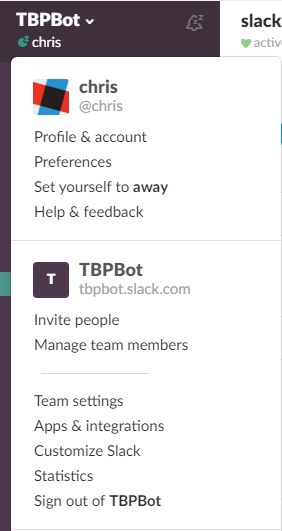
In the Slack application, click the drop-down arrow to the right of your teams name and select ‘Apps & integrations.’

Click Apps & integrations

This will open up the browser with your teams Apps and Integraitons, you’ll need to navigate to the ‘Build’ part of Slack to create a new integration for your channel.

Top right menu of Slack, click Build

You’ll then receive two options: An app for other Slack teams, or Something for just my team. Select “Something just for my team.”

Select Make a Custom Integration

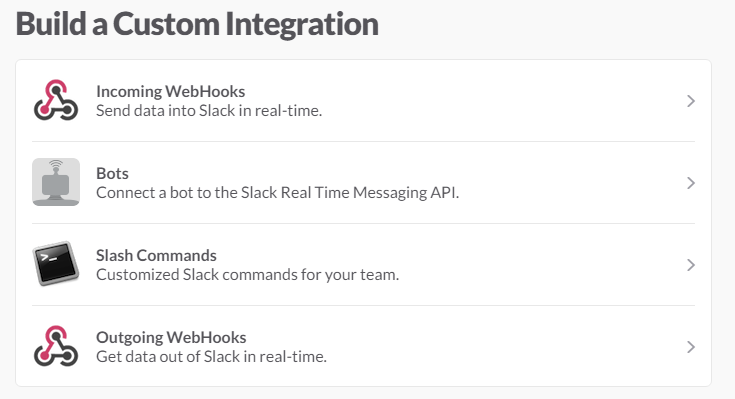
Once you click “Make a Custom Integration,” you’ll be prompted with these options, select “Incoming WebHooks.”

Select Incoming WebHooks

You’ll now be prompted with an option to select a channel that the webhook works for, this part is entirely up to you. We created a new channel that is used specifically for coffee. We called it #coffee and added the webhook, as well as other employees that might need to know to refill the coffee. You can also create webhooks to send as direct messages.

Choose a channel and click Add Incoming WebHooks Integraiton

After selecting your channel and clicking the “Add Incoming WebHooks Integration”, you’ll be sent to the configuration page for the Webhook. This page will look like the image below.

Slack WebHook configuration page.

From this page you can see all of the different settings that you can tweak for your webhook. We decided that since this was a coffee-bot, why not customize the name and icon to have something to do with coffee.

You’ll now need to copy the Webhook URL for use in the next part of the guide. Don’t forget to click Save Settings if you’ve customized the look and name of your integration.

Head over to the files that you extracted and open up the main.py file with your favorite text editor. The code should look like below:

import requests
def handler(event, context):
requests.post('insert your url between these quotes',json={"text" : "Insert your message between these quotes, slack emotes like :coffee: work in the text body" })

Where it says ‘insert your url between these quotes’ is where you will… well… insert your URL.

Next, customize your message to say whatever you want it to. You can insert different emoji’s within the message, here is an example of what we have:

:three: : Coffee is out on the *3rd floor*. More please! :coffee:

Once you have customized your message and placed it between the quotes for the message part of the code, your final main.py should look something like this:

import requests
def handler(event, context):
requests.post(‘https://hooks.slack.com/services/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',json={"text" : “:three: : Coffee is out on the *3rd floor*. More please! :coffee:” })

Once you are finished with the main.py file, save it and close your editor.

AWS Configuration

Next, we need to sign up for an Amazon AWS account. Go to the AWS IoT Button website at https://aws.amazon.com/iot/button/ and you’ll find a button saying “Create an Account”. Go through the process of signing up. This will require a credit card, but the first 1-million calls per month to your code are free, so this isn’t going to cost you anything to run.

After signing up for an AWS account, you now need to head to the AWS Dashboard. At the top of the page, there is a drop-down called “Services”, mouse-over the services tab, and click “Lambda” in the menu.

Select Lambda from the menu.

When you get to the Lambda page, you will be prompted to create a new Lambda Function. The next part of this guide will walk you through what I found to be the trickiest part of this whole process.

Click the “Create a Lambda Function” button on the Lambda services pages. After clicking, you’ll be prompted with pre-built Lambda functions known as Blueprints. At the bottom there is a button to skip this and create your own. Press the Skip button to move on to create a custom Lambda.

I’m going to work on creating a Blueprint for this so you don’t have to mess with the code, but that will come as I find the documentation to create a blueprint. If you know anymore about doing so, please tweet it to me @nullrefexc

Press Skip when you see this page.

At this point, you are prompted with a text editor to write code, we aren’t going to do this, instead we are going to upload the code that we wrote earlier.

Head back to finder or your file explorer where main.py is currently stored, and we now need to package all the code together to in a .zip file for AWS. This part is confusing in the AWS documentation, so I am documenting it here. DO NOT ZIP THE FILE THAT ALL THE FILES RESIDE IN. We need to zip the contents of the file with only the items we need. These files are:

  • main.py
  • requests
  • requests-2.10.0.dist-info

To select only these three files, hold the Ctrl button on your keyboard, and click on the the three files needed, they should highlight. You will now need to zip them, right click on one of the selected files, and click Send To… and select Compressed file. It will prompt you to change the name of the file, call it whatever you want.

Select these three files.
After compressing, I renamed the file to main.zip

Once we have finished compressing the file, we can head back to AWS to configure our Lambda.

You’ll want to set the configurations to match the following image. The Name and description is up to you, but you will need to select Python 2.7 for the Runtime.

You will also upload the .zip file we just created by clicking the “Upload a .ZIP file” option and then clicking Upload.

Set you configuration to closely match the above.

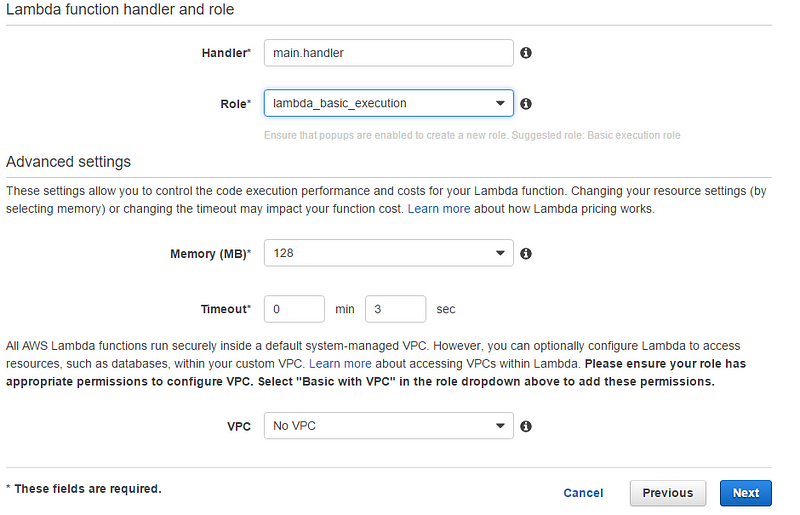
We now need to get into the Lambda function handler/role and Advanced settings. You will need to set the Handler to main.handler.

main.handler represents the piece of code that needs to execute. So we want the handler function in the main.py file to execute here.

What your Handler should look like.

Next we need to select a Role for the code to use. This requires heading to an external page by clicking on an item in the drop-down menu. Click the drop-down menu and select “*Basic execution role.” This should open up a new page, with the Role permissions. Simply click Allow at the bottom of the page that popped up and head back to your Lambda configuration.

Once you have created a Role and selected it, the rest of the configuration should look like the image below. Once it is all set, click Next.

Final settings for Lambda function.

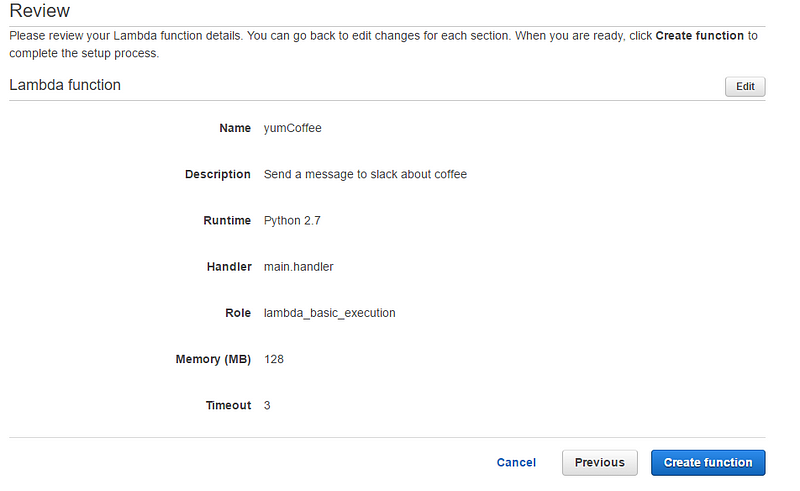
You’ll be prompted with a Review screen to confirm all your settings. If everything looks good, click “Create function.”

Confirm your Lambda Function settings.

You will be kicked back to the functions dashboard now, at the top there is a button to Test you code. You can click that button to confirm that it works.

Click Test

Clicking the Test button for the first time will prompt you to create a test to run, select the Hello World example and click Save and test.

Test Configuration

If everything worked, you should see a message in the Slack channel that you created your webhook for. Here is an example of the message I sent when I clicked Test.

Message sent from “coffee-bot”

Now that our messages are being fired, we need to set-up the last part of this, which is the AWS IoT button.

Head back to your browser and the dashboard for the Lambda function we created. We need to select the “Event sources” tab from the dashboard. Click the “Add event source” and a dialog pops-up. Select AWS IoT and the dialog should bring up more options. Choose the “IoT Button” from the “IoT type”drop-down. This can be seen below.

Enter your IoT serial and you’ll be given instructions on setting up your IoT button.

When you click “Generate certificates and keys” you will be given a set of instructions on how to connect to the IoT button. Makes sure to download the certificate.pem and private.key files before connecting to your IoT buttons.

Follow the directions provided by AWS and follow the guide provided here. Once your device is configured, re-connect to your network, and click Submit. You should receive a green dialog confirming that the button was configured correctly and the light on the AWS IoT button should turn green.

You are now set to use your IoT button as you configured it. We decided to stick ours to a sign and set it next to the coffee dispensers. It’ll be nice to know when a fresh brew is on the way to floor. Check out the sign we made, with emoji’s of course.

Sign next to the coffee dispenser.
Slack messages from clicking the button.

If you have any questions about how to set this up, please feel free to reach out to me on Twitter. Also, I’m interested in what other end up doing with these, could be cool to see.

Reach me here: https://twitter.com/nullrefexc or @nullrefexc on most other social platforms.

As it turns out, these buttons are now sold out and aren’t expected to be in-stock until August. You can order them here and receive them when they are available: http://www.amazon.com/AWS-IoT-Button-Limited-Programmable/dp/B01C7WE5WM


Nmap 사용법

# nmap [1.스캔유형] [2.옵션] [호스트(ip)]


1. 스캔 유형

-sS : TCP SYN 스캔(스텔스 스캔)

-sT : TCP 연결을 사용한 포트스캔

-sP : Ping을 이용한 스캔

-sA : ACK 패킷에 대한 TTL값을 분석한다.(방화벽 규칙상태 확인시 사용)

-sR : RPC를 이용하여 포트를 스캔한다.

-sW : 윈도우 스캔은 ACK 스캔과 같은데 특정 장치에 대해 열린, 닫힌 포트를 구별한다.

-sI : Idel 스캔을 가장 은밀한 스캔, 느리고 복잡하다.

-sU : UDP 포트스캔

-sF : FIN 패킷을 이용하여 스캔한다.

-sX : Xmas 패킷을 이용하여 스캔한다.

-sN : Null 패킷을 이용하여 스캔한다.


2. 옵션

2-1. 포트 옵션

-p 22 : 22번 포트 스캔

-p (service) : 서비스 명으로 포트스캔

-p 20, 40, 80 : 20, 40, 80 포트스캔

-p 1-1023 : 1~1023 포트스캔, 범위로 지정


2-2 output 옵션

-v : 출력을 자세하게

-w : -v보다 더 자세하게

-oN <File명> : 일반 파일 형식으로 출력

-oX <File명> : XML 파일 형식으로 출력


2-3. 기타옵션

-O : 대상 호스트 운영체제 스캔

-PN : 호스트가 살아있는지 ping을 하지 않음으로 log 파일에 기록될 가능성을 줄인다.


2-4. 핑스캔

-sP : 핑 스캔(ICMP) 사용, 내부단은 ARP 요청이 대신함

-sL : 목록 스캔(서버가 살았는지 죽었는지 확인하는 좋은 방법)

-PS : TCP SYN 패킷을 보낸다. (SYN -> SYN, ACK -> RST)

-PA : TCP ACK 패킷을 보낸다. (위의 -PS와 비슷하지만 방화벽을 우회하기 위해 ACK를 보낸다.)

-PU : UDP핑, 빈UDP패킷을 해당 포트를 보낸다. TCP 필터링을 피해간다.

-PO : IP 프로토콜 핑, ICMP, IGMP, IP패킷을 이용한 스캔

-PR : ARP 스캔


3. 간단 사용 예

nmap -v 192.168.1.* : 해당 호스트의 정보를 조금 더 자세하게 보여준다.

nmap 192.168.1.*/16 : 네트워크 전체를 스캔한다.

nmap -sp 192.168.1.* : 192.168.1.*가 살아있는지 스캔한다.

nmap -sR -p 1-20000 192.168.1.200 : 192.168.1.200의 1번부터 20000까지 RPC 포트를 찾는다.

nmap -sU -PT 192.168.1.200/16 : 192.168.1.200 네트워크 호스트들에게 ACK 보내 응답을 기다리고 열려진 UDP 포트를 찾는다.

로컬 보안 정책으로 설정할 수 있는 부분이 참 많다고 말씀드렸는데, 로컬 그룹 정책은 대부분 레지스트리로 설정이 가능하지만 로컬 보안 정책은 그렇지 않기 때문에, 다수의 서버에 동일한 설정을 적용해야 하는 경우 매우 난감할 것입니다. 일일이 마우스로 하나 하나 설정하다 보면 엄청난 시간이 소요되겠죠.

하지만 윈도우에서 마우스로 가능한 설정은 대부분 커맨드로도 가능하다는 점 명심하시기 바랍니다. 단지 몰라서 활용하지 못할 뿐이지요.

오늘은 로컬 보안 정책을 secedit 명령어를 통해 설정해 보겠습니다.


위 보안 설정을 커맨드로 처리해볼까요? 우선 secedit으로 현재 설정을 추출해봅시다.

예제) secedit /export /cfg c:\test.inf

이렇게 하시면 C 드라이브 루트에 test.inf 파일이 생성되겠죠? 이 파일을 열어서 쭈욱 보시면... 위 보안 정책들이 고스란히 들어있음을 알 수 있습니다.

크게 보면 4가지 섹션으로 구성되어 있는데요

[System Access]
[Event Audit]
[Registry Values]
[Privilege Rights]

계정 정책은 System Access에 들어있고, 감사 정책은 Event Audit에 들어있고, 사용자 권한 할당은 Privilege Rights에 들어있습니다. 보안 옵션은 Registry Values에도 들어있고,  System Access에도 일부 들어있습니다. 그런데 보안 옵션은 대부분 레지스트리 값으로 구성되어 있기 때문에, 굳이 secedit 커맨드를 사용하지 않아도 레지스트리로 설정이 가능합니다.

그렇다면 우리의 타겟은 바로 계정 정책, 감사 정책, 사용자 권한 할당이 되겠습니다. 저는 이 글에서 계정 정책만 가지고 예제를 구성해 보겠습니다.

예를 들어 위 그림에 나온 내용과 같이 설정하고 싶다면

암호는 복잡성을 만족해야 함 : 사용
최근 암호 기억 : 3개
최대 암호 사용 기간 : 31일
최소 암호 길이 : 8문자
최소 암호 사용 기간 : 1일
계정 잠금 기간 : 30분
계정 잠금 임계값 : 5번
다음 시간 후 계정 잠금 수를 원래대로 설정 : 30분


설정 파일 중에 설정에 필요한 부분만 골라서 남겨주시면 되는데, 마지막 [Version] 부분은 넣어줘야 오류가 나지 않더군요. 즉 위 내용을 설정 파일로 구성하면 아래와 같습니다.

[System Access]
MinimumPasswordAge = 1
MaximumPasswordAge = 31
MinimumPasswordLength = 8
PasswordComplexity = 1
PasswordHistorySize = 3
LockoutBadCount = 5
ResetLockoutCount = 30
LockoutDuration = 30
[Version]
signature="$CHICAGO$"
Revision=1


위 내용을 예를 들어 C 드라이브 루트에 test.inf 파일로 저장했다고 가정하겠습니다. 그리고 이 설정파일을 가지고 이제 각 서버에 들어가서 일괄적으로 적용하면 되겠죠?

예제) secedit /configure /db C:\test.sdb /cfg C:\test.inf

사실 /db 부분을 왜 꼭 지정해야 하는지는 잘 모르겠습니다만... 저는 임시 파일 정도로 취급하기로 했습니다. 작업 후 db 파일은 그냥 삭제해도 아무런 지장이 없더군요.

나머지 설명드리지 않은 감사 정책과 사용자 권한 할당 부분도 응용해서 활용하실 수 있겠죠? 사용자 권한 할당의 경우도 예를 들어 바로 앞 글에서 보여드렸던 시스템 종료 권한을 snoopy에게만 주고 싶다면

[Privilege Rights]
SeShutdownPrivilege = snoopy

정도가 되겠습니다.


서버나 보안 이야기 재미가 없으시죠? 일반 사용자에겐 거의 무의미한 이야기로 들릴 것인데, 저는 업무상 관련이 있기 때문에 누군가 저와 비슷한 일을 하는 분이 계시다면 도움이 될까 싶어 올려드리고 있습니다.

개인적으로 다수의 서버에 동일한 설정을 마우스 클릭 반복으로 처리하는 행위는 매우 소모적이라 생각하기 때문에, 항상 자동화 스크립트를 짜고 웬만한 설정은 다 스크립트로 처리하려 노력하고 있습니다. 예를 들어 위에서 진행했던 보안 설정들을 배치파일 하나로 만들어 볼까요?

@echo off
echo [System Access] > test.inf
echo MinimumPasswordAge = 1 >> test.inf
echo MaximumPasswordAge = 31 >> test.inf
echo MinimumPasswordLength = 8 >> test.inf
echo PasswordComplexity = 1 >> test.inf
echo PasswordHistorySize = 3 >> test.inf
echo LockoutBadCount = 5 >> test.inf
echo ResetLockoutCount = 30 >> test.inf
echo LockoutDuration = 30 >> test.inf
echo [Version] >> test.inf
echo signature="$CHICAGO$" >> test.inf
echo Revision=1 >> test.inf
secedit /configure /db test.sdb /cfg test.inf
del test.sdb
del test.inf
exit


위 내용을 CMD 파일로 저장해서 실행하면 보안 설정이 그대로 적용되겠죠? 저는 요즘 회사에서 이런거 만들면서 놀고(?) 있습니다. ^^

apache 2.0.59를 설치한뒤에는 두가지 수정

1. /usr/local/apache2/conf 의 httpd-std.conf 를 httpd.conf로 복사한다.

2. httpd.conf 파일을 vi로 열어 "Group -1"을 찾아 "Group nobody"로 변경해준다.


PHP 5.2.1을 설치한뒤에는 이렇게 수정

3. httpd.conf 파일을 vi로 열어 다음의 두줄을 추가한다.

LoadModule php5_modules/libphp5.so

AddType application/x-httpd-php .php


아파치 구동 : /usr/local/apache2/bin/apachectl start

FTP 활성화

# svcadm enable ftp

TELNET 활성화

# svcadm enable telnet


FTP 비활성화

# svcadm disable ftp

TELNET 비활성화

# svcadm disable telnet


root을 이용해서 ftp/telnet을 사용해야 된다면

# vi /etc/ftpd/ftpusers -> 파일을 open하셔서 'root' 부분을 주석처리

# vi /etc/default/login -> 파일을 open하셔서 "CONSOLE" 부분을 주석처리

olaris 11: Installing MySQL

Recently I have been spending some time learning about database technologies (Oracle Databases at Keste as well as MySQL on my own).  Part of this I have decided to carry over into my existing work with Solaris, and go through the installation process using the Image Packaging System which is in Solaris.  Now really the IPS does all the heavy lifting for us, but we still need to know how to utilize the package manager to get the desired result.

Searching for the MySQL Package

Now when we search using the below command, you will notice that we are using the parameter -r this tells it to use the remote repository in addition to the local repository, this allows us to find software that we do not have installed on the machine.

# pkg search -r mysql
INDEX       ACTION VALUE                                                                   PACKAGE
pkg.summary set    A MySQL database adapter for the Python programming language            pkg:/library/python-2/python-mysql-26@1.2.2-0.175.1.0.0.11.0
pkg.summary set    Apache Portable Runtime Utility (APR-util) 1.3 DBD Driver for MySQL 5.0 pkg:/library/apr-util-13/dbd-mysql@1.3.9-0.175.1.0.0.24.0
pkg.summary set    MySQL Database Management System (Base)                                 pkg:/database/mysql-common@0.5.11-0.175.1.0.0.24.0
pkg.summary set    MySQL extension module for PHP                                          pkg:/web/php-53/extension/php-mysql@5.3.14-0.175.1.0.0.24.0
pkg.summary set    MySQL extension module for PHP                                          pkg:/web/php-52/extension/php-mysql@5.2.17-0.175.1.0.0.24.0
pkg.summary set    MySQL 5.1 Database Management System                                    pkg:/database/mysql-51@5.1.37-0.175.1.0.0.24.0
pkg.summary set    MySQL 5.1 libraries                                                     pkg:/database/mysql-51/library@5.1.37-0.175.1.0.0.24.0
pkg.summary set    MySQL 5.1 tests                                                         pkg:/database/mysql-51/tests@5.1.37-0.175.1.0.0.24.0
basename    file   usr/mysql/5.1/bin/amd64/mysql                                           pkg:/database/mysql-51@5.1.37-0.175.1.0.0.24.0
basename    file   usr/mysql/5.1/bin/mysql                                                 pkg:/database/mysql-51@5.1.37-0.175.1.0.0.24.0
basename    file   usr/mysql/5.1/bin/sparcv9/mysql                                         pkg:/database/mysql-51@5.1.37-0.175.1.0.0.24.0
name        group  mysql                                                                   pkg:/database/mysql-common@0.5.11-0.175.1.0.0.24.0
basename    link   usr/bin/mysql                                                           pkg:/database/mysql-51@5.1.37-0.175.1.0.0.24.0
name        user   mysql                                                                   pkg:/database/mysql-common@0.5.11-0.175.1.0.0.24.0
basename    dir    etc/mysql                                                               pkg:/database/mysql-51@5.1.37-0.175.1.0.0.24.0
basename    dir    usr/mysql                                                               pkg:/database/mysql-51@5.1.37-0.175.1.0.0.24.0
basename    dir    usr/mysql/5.1/include/mysql                                             pkg:/database/mysql-51@5.1.37-0.175.1.0.0.24.0
basename    dir    usr/mysql/5.1/share/mysql                                               pkg:/database/mysql-51@5.1.37-0.175.1.0.0.24.0
basename    dir    var/mysql                                                               pkg:/database/mysql-51@5.1.37-0.175.1.0.0.24.0
basename    dir    usr/mysql                                                               pkg:/database/mysql-51/library@5.1.37-0.175.1.0.0.24.0
basename    dir    usr/mysql/5.1/lib/amd64/mysql                                           pkg:/database/mysql-51/library@5.1.37-0.175.1.0.0.24.0
basename    dir    usr/mysql/5.1/lib/mysql                                                 pkg:/database/mysql-51/library@5.1.37-0.175.1.0.0.24.0
basename    dir    usr/mysql/5.1/lib/sparcv9/mysql                                         pkg:/database/mysql-51/library@5.1.37-0.175.1.0.0.24.0
basename    dir    usr/mysql                                                               pkg:/database/mysql-51/tests@5.1.37-0.175.1.0.0.24.0

Now in the output we are looking for a pkg.summary which is the software we are looking for, in our case pkg:/database/mysql-51 or simply mysql-51.

Once we think we have the right package I like to do a pkg info to make sure that it is what I expect, again here we want to look against remote repositories as well with the -r parameter.

# pkg info -r mysql-51
Name: database/mysql-51
Summary: MySQL 5.1 Database Management System
Category: Development/Databases
State: Not installed
Publisher: solaris
Version: 5.1.37
Build Release: 5.11
Branch: 0.175.1.0.0.24.0
Packaging Date: September  4, 2012 05:09:22 PM
Size: 147.23 MB
FMRI: pkg://solaris/database/mysql-51@5.1.37,5.11-0.175.1.0.0.24.0:20120904T170922Z

Install the MySQL Package

Here we can install MySQL 5.1 via the IPS repositories.

# pkg install mysql-51
Packages to install:  2
Create boot environment: No
Create backup boot environment: No
Services to change:  2
 
DOWNLOAD                                PKGS         FILES    XFER (MB)   SPEED
Completed                                2/2       252/252    52.2/52.2 16.3M/s
 
PHASE                                          ITEMS
Installing new actions                       343/343
Updating package state database                 Done
Updating image state                            Done
Creating fast lookup database                   Done

Enable the MySQL Service

Now lets take a look at the service.  We can see that the service is installed but disabled.

# svcs -a | grep mysql
disabled       10:28:40 svc:/application/database/mysql:version_51

Enable the service.

# svcadm enable mysql
# svcs -a | grep mysql
online         10:30:26 svc:/application/database/mysql:version_51

Connect to MySQL

# mysql
Welcome to the MySQL monitor.  Commands end with ; or \g.
Your MySQL connection id is 1
Server version: 5.1.37 Source distribution
 
Type 'help;' or '\h' for help. Type '\c' to clear the current input statement.
 
mysql&gt;

Please note this is not a secure MySQL configuration.  You will need to secure this before use.


지난 포스팅

2015/02/27 - [Exchange Server 2013] - Exchange Server 2013 설치 (1)

이번에는 지난 포스팅에 이어서 Exchange Server 2013 커넥터, 가상 디렉터리, 인증서 구성 을 다루도록 하겠습니다.


메일 발송을 위한 가장 먼저 송신 커넥터를 설정 방법을 설명 드리겠습니다.

1. 관리자 페이지(ECP)에 접속하여 - 메일 흐름 - 송신 커넥터 - 새로 만들기 를 선택합니다.

2. 새 송신 커넥터 설정 화면에서 이름을 지정한 뒤 인터넷 - 다음 을 선택합니다.

3. 다음 을 클릭합니다.


4. 추가 (+) 를 클릭합니다.

5. FQDN(정규화된 도메인 이름) 에 *을 입력한 뒤 저장을 클릭합니다.

6. 추가 (+) 를 클릭합니다.

7.서버를 더블 클릭하여 추가한 뒤 확인 - 마침 을 클릭하여 설정을 완료합니다.


이어서 Outlook Anywhere 및 가상 디렉터리 설정을 진행하도록 할텐데요.

Outlook Anywhere 에서는 외부에서 접속할 주소 및 인증 방법을 선택할 수 있습니다.

가상 디렉터리는 외부에서 접속할 수 있는 세부 주소를 설정할 수 있는데요. http://mail.limcm.kr/owa, http://mail.limcm.kr/ecp 와 같이 필요한 디렉터리를 설정할 수 있습니다.


1. 관리 센터에서 서버 를 선택한 뒤 본인의 메일 서버를 더블 클릭합니다.


2. Outlook Anywhere - 외부 호스트 이름에 설정할 외부 주소를 입력합니다. (Ex: mail.limcm.kr)

인증 방법은 NTLM 을 선택한 뒤 저장을 클릭합니다.


3. 가상 디렉터리 를 선택한 뒤 외부 도메인 액세스 를 클릭합니다.


4. + 버튼을 클릭 한 뒤 EX00 을 선택합니다.


5. 외부 클라이언트 액세스 서버에 사용할 도메인 이름을 입력합니다. (Ex: mail.limcm.kr)


다음은 Wildcard SSL 등록 방법을 설명 드리겠습니다.

많은 사이트들은 사설인증서로 설정하는 방법에 대해서 설정하는 방법들을 다루고 있습니다.

사설 인증서의 장점은 비용이 발생하지 않으며, 내부망에서 쉽게 설정 가능합니다.

사설인증서 구성으로 연습을 한다면 아래의 글을 참고하면 됩니다.

2017/04/18 - [Exchange] - Exchange. 사설인증서 구성하기


단점으로는 외부망에서 이용시 일일히 인증서를 받아야 하며, OWA App 및 Exchange 설정을 스마트폰에서 이용이 어렵습니다. 그래서 저는 도메인을 구입 및 인증서 구입을 진행하였습니다. 대략 8~9만원 정도의 비용이 발생되었지만, 저에게는 비용 그 이상의 자산이 되었다고 생각합니다.


1. 서버 - 인증서 - 새로 만들기 (+) 를 클릭합니다.

2. 인증 기관이 서명한 인증서에 대한 요청 만들기 기본 값을 확인 한 후 다음을 클릭합니다.


3. 인증서 이름을 입력합니다. Ex) *.domain.com


4. 와일드카드 인증서 요청을 체크한 다음 *.domain.com 의 형태로 루트 도메인을 입력합니다.

5. 찾아보기를 클릭 한 뒤, 서버를 선택합니다.

6. 인증서 정보를 입력합니다.

7. 인증서 요청 파일의 저장할 위치를 지정하여 요청을 완료합니다.

8. 인증서 요청 과정을 진행합니다. 저는 https://gogetssl.com 에서 구입하여 진행하였습니다.

해당 과정을 보고 싶다면, 상단의 강의 동영상을 참고하시기 바랍니다.


9. 대기 요청 중인 인증서를 선택한 뒤 완료 를 클릭합니다.

10. 인증서의 위치 및 확장자를 지정한 뒤 확인을 클릭합니다.

11. 완료된 인증서를 더블 클릭한 뒤, 서비스 - SMTP, IIS 를 체크한 뒤 저장 하여 인증서 설정을 마칩니다.


모바일, 외부 전송 및 접속을 위한 서브 도메인 설정은 아래와 같이 진행합니다.

서브도메인

도메인명

레코드 타입

IP주소/레코드 값

Mail

Domain.com

서브도메인(A)

메일서버 공인IP 주소

Autodiscover

Domain.com

별칭(CNAME)

Mail.domain.com


Domain.com

MX레코드

Mail.domain.com

OWA

Domain.com

별칭(CNAME)

Mail.domain.com


EX) Hosting.kr 기준


공유기를 사용하는 환경이라면 VM의 사설 아이피에 포트포워딩을 설정합니다.

Https: 443, smtp: 25

아래는 IP TIME 기준 입니다.


포트 포워딩 까지 완료하면 Exchange 구축이 완료되었다고 볼 수 있습니다.

이번 포스팅은 여기서 마치겠습니다.


신고


출처: http://blog.limcm.kr/13 [페푸리의 Office Server 이야기]

이번 포스팅은 Exchange Server 2013 설치를 다루며, 인증서 및 세부설정은 다음 포스팅에 다루도록 하겠습니다.

이해를 돕기 위하여 구축 과정을 녹화하였습니다.


OS: Windows Server 2012 R2

설치파일: Exchange Server 2013 CU6

준비물: DC00. Active Directory 가 구축된 VM

 2015/02/20 - [Windows Server 2012 R2] - Windows Server 2012 R2 AD 구성


EX00. Windows Server 2012 R2 최신 업데이트가 된 VM


1. AD 구성과 비슷하게 컴퓨터 이름 변경 및 IP 주소 변경 작업을 진행합니다. 예) EX00, 192.168.1.4


2. 하단의 PowerShell 을 실행하여 아래의 명령어를 입력하여 필수 구성요소 설치 작업을 진행합니다. 완료 후 재부팅을 진행합니다.


Install-WindowsFeature AS-HTTP-Activation, Desktop-Experience, NET-Framework-45-Features, RPC-over-HTTP-proxy, RSAT-Clustering, RSAT-Clustering-CmdInterface, RSAT-Clustering-Mgmt, RSAT-Clustering-PowerShell, Web-Mgmt-Console, WAS-Process-Model, Web-Asp-Net45, Web-Basic-Auth, Web-Client-Auth, Web-Digest-Auth, Web-Dir-Browsing, Web-Dyn-Compression, Web-Http-Errors, Web-Http-Logging, Web-Http-Redirect, Web-Http-Tracing, Web-ISAPI-Ext, Web-ISAPI-Filter, Web-Lgcy-Mgmt-Console, Web-Metabase, Web-Mgmt-Console, Web-Mgmt-Service, Web-Net-Ext45, Web-Request-Monitor, Web-Server, Web-Stat-Compression, Web-Static-Content, Web-Windows-Auth, Web-WMI, Windows-Identity-Foundation


Exchange Server 2013 필수 구성요소 : https://technet.microsoft.com/ko-KR/library/bb691354(v=exchg.150).aspx


3. 필수 설치 프로그램인 Microsoft Unified Communications Managed API 4.0 를 설치합니다.

http://go.microsoft.com/fwlink/p/?linkId=258269

영상에는 Filter Pack 도 진행하였지만 해당 부분은 Exchange Server 2010에서 필요한 구성요소 였습니다. (괜히 진행함;;)


4. 시스템 - 설정 변경 - 변경 - 도메인 정보를 입력한 뒤 확인을 클릭합니다.


5. Admin 계정 정보를 입력하여 도메인 연결 과정을 진행합니다.


6. Exchange Server 2013 를 설치 할 VM 에서 설치 파일을 다운로드 합니다.

Exchange Server 2013 누적업데이트 16https://www.microsoft.com/en-us/download/details.aspx?id=54931


7. 파일을 실행하면 압축 해제 과정이 진행 되며, 해제한 폴더에서 Setup 파일을 실행합니다.


8. 다음을 클릭합니다. (기본 값으로 설치를 진행하므로 계속 다음을 클릭합니다.)


9. 사용권 계약에서 동의함 - 다음을 클릭합니다.

10. 서버 역할 선택에서 사서함 역할, 클라이언트 액세스 역할을 체크한 뒤 다음을 클릭합니다.

각각의 역할을 나눠서 설치하는 것이 좋겠지만 여건상 하나의 VM에 두가지 역할을 바로 설치하도록 하겠습니다.

11. 선행 조건 검사 단계를 진행합니다.

12. 설치를 진행합니다. 완료 후 재부팅을 진행합니다.


13. 관리자 페이지에 접속합니다.

14. 관리센터가 올바르게 나타나는지 확인합니다.


이후 자세한 설정 과정은 다음 포스팅에서 다루도록 하겠습니다. 


출처: http://blog.limcm.kr/12 [페푸리의 Office Server 이야기]


1. SQL Injection 공격 원리

- SQL Injection 공격을 이해하기 위해서는 데이터가 어떤 과정으로 저장되고 사용되는지 알아야 한다.

- 게시판에서 회원가입을 할 때 아이디와 패스워드를 입력한 정보는 모두 어디에 저장이 되었을까?

- 이 게시판에서는 회원가입 정보를 board 데이터베이스의 member 테이블에 저장한다.

- 아이디는 bId 열에, 패스워드는 bPass 열에 각각 저장되어있다.


- 로그인 페이지 파일명은 default.htm이다.

- 등록된 사용자의 아이디와 패스워드를 입력 받아 member 테이블에서 동일한 아이디와 패스워드를 가진 레코드를 찾아 사용자가 게시판에 접근하는 것을 허용한다.

- 계정이 존재하지 않거나 패스워드가 올바르지 않으면 잘못된 로그인임을 알려줄 것이다.

- 아래 소스를 보면 login_ck.asp 파일로 정보를 보내고 있음을 확인할 수 있다.


- login_ck.asp 파일을 열어보면 아이디(memberid)와 패스워드(pass1)를 받아서 SQL 쿼리문(strSQL)을 만들고 실행시켜 member 테이블의 정보를 가져온다.

- 입력된 아이디와 패스워드에 대한 결과 값이 있다면, 즉 실제로 등록된 사용자라면 board_list.asp가 실행되고, 아이디와 패스워드를 잘못 입력하거나 등록되지 않은 사용자라면 잘못된 로그인입니다라는 메시지를 보낸다.


2. 공격 방법

▶ 인증 우회 ( Authentication Bypass )

⊙ 인증 우회

- 가장 널리 이용되는 SQL Injection 방법은 OR 연산을 사용하는 것이다.

- 입력 폼에 `or '1'='1 문을 입력하여 결과 값을 참으로 만들어 우회하는 방법이다.

- 예를 들어, 로그인 화면에서 아이디는 TEST_ID로 하고, 패스워드는 test로 해서 로그인을 시도할 경우 패스워드가 틀려서 잘못된 로그인이라는 메시지를 받게 된다.

- 하지만, 패스워드에 test' or '1'='1을 입력하면 login_ck.asp 파일에서 회원 로그인을 처리하기 위해 데이터베이스에 요청하는 쿼리문을 최종적으로 select * from member where bId = 'TEST_ID' and bPass = 'test' or '1'='1'과 같이 전달되고 이 때 where 절 뒤쪽에 임의로 삽입된 oR 조건에 의해서 OR 앞이나 뒤의 두 조건 중에 하나라도 참이면 참이 되어 결과 값을 반환한다. 여기에서 1과 1은 같은 값이므로 앞에 어떠 값이 오더라도 항상 참.

- 여기서 한 가지 더 주의할 점은 홑따옴표(')의 사용이다. 아래의 소스 코드에서 알 수 있듯이 아이디와 패스워드로 SQL 문을 생성


- 이 때, TEST_ID와 test은 홑따옴표 안에 들어간다. 이미 알고 있는 것처럼 문법상 홑따옴표는 2개를 쌍으로 사용해야 한다.

- 따라서, SQL 문을 조작할 때도 에러가 나지 않도록 주의해야 한다.

- test' or '1'='1을 입력하면 아래와 같은 SQL 문이 만들어진다.


- 모든 사이트가 동일한 형식으로 쿼리문을 생성하는 것은 아니다. 여기에서도 test' or '1'='1 뿐만 아니라 'or 1=1도 공격에 이용할 수 있다.


⊙ 패스워드 우회

- 패스워드가 틀려도 로그인에 성공할 수 있는지 확인하기 위해 로그인 창에 쿼리문을 입력해보자


- 로그인에 성공하였지만 TEST_ID가 아니고 admin으로 로그인 되었을까..

- SQL 문을 한번 더 보게 되면, 연산자  우선순위로 볼 때, AND는 OR보다 먼저 계산된다.

- 따라서, (bId='TEST_ID' and bPass='test')가 먼저 계산되어 그 결과가 FALSE로 되고, FALSE or (1=1)이 그 다음에 계산된다.

- 즉, FALSE or TRUE가 되어 결과적으로 TRUE가 되고 결국 4)와 같이 member 테이블에서 모든 레코드 값을 가져오게된다.


- 가져올 아이디 값이 정해지지 않았기 때문에, 가장 위쪽의 레코드를 읽어온다.

- 따라서, member 테이블에는 아래와 같이 2개의 계정만 존재하고, TEST_ID보다 admin이 위에 있다.

- 따라서, 가장 위에 있는 레코드의 admin 값을 가져오게 되어 admin으로 로그인에 성공한 것이다.

- 많은 경우에 관리자(admin)가 가장 위에 존재하기 때문에 이런 방법으로 관리자로 로그인 할 수도 있다.


⊙ 주석문을 이용한 admin 로그인

- 1)의 SQL 문을 2)처럼 바꾸면, 주석문(--) 이후의 문자열은 주석 처리되어 무시되므로 결과적으로 3)의 SQL 문이 된다.


- 이것을 로그인 페이지에서 입력해보자. ( 이 때도 홑따옴표를 잊지 말자.)


-  admin으로 로그인에 성공했다. 이제 이 게시판의 관리자 권한을 갖게 된 것이다.


▶ 시스템 명령어 실행

- xp_cmdshell은 MS-SQL DB에 잇는 master DB의 확장 프로시저로서, 이것을 이용하면 시스템 명령어(OS Call)를 실행할 수 있다.

- SQL 쿼리 분석기 창에서 xp_cmdshell을 사용하기 위해 등록할 떄는 다음과 같은 명령어를 실행하면 된다.


등록

 sp_addextendedproc 'xp_cmdshell', 'xplog70.dll

제거

 sp_dropextendedproc 'xp_cmdshell' 또는

 C:\Program Files\Microsoft SQL Server\MSSQL\Binn에서 xplog70.dll 삭제


⊙ 두가지 이상의 쿼리문 실행

- 두 가지 이상의 명령을 연속해서 사용할 때는, 세미콜론(;) 표시를 이용하여 사용할 수 있다.

- 먼저 member 테이블의 내용을 확인하고, 자기 자신의 시스템에 ping 명령을 수행하는 ping 127.0.0.1을 실핼하였다.


⊙ 시스템에 폴더 생성하기

- 앞서 테스트한 ping 127.0.0.1이 포함된 SQL injection 명령을 게시판에서 실행하면, 공격이 성공하여 잘 실행이 되어도 결과를 확인할 방법이 없다. 그렇기 때문에 폴더를 만들어 시스템 명령어가 잘 실행되었는지 확인하자.

- 폴더를 생성하는 명령은 다음과 같다.


- 로그인 페이지의 아이디 입력 폼에 위의 쿼리문을 입력하고 싶어도 할 수 없을 것이다.

- 왜냐하면 아래의 예제에서 그 내용을 확인할 수 있듯이 입력 값의 길이가 15로 제한되어 있기 때문이다.

- 이렇게 길이에 제한이 있어 원하는 SQL Injection 문을 직접 입력할 수 없는 경우도 있다.


- 이럴 때는 프록시 툴을 이용하여 길이 제약을 피할 수 있다.

- 예로들면 오디세우스 프록시 툴을 이용하여 SQL Injection 문을 서버로 전달할 것이다.

- 먼저 admin/admin 계정으로 로그인할 때 전송되는 내용을 확인해보자.


- memberid=admin 부분을 아래와 같이 조작하여 전송하면 길이 제한에 상관없이 시스템 명령어를 실행할 수 잇다.

- URL 인코딩을 위해 공백은 %20으로 변경해야 한다.


- admin 계정으로 로그인되었지만 게시판 리스트만 보일 뿐 특별한 내용은 없다.

- 명령어가 제대로 실행되었는지 실제로 폴더를 확인해보면 C:\board 아래에 test 폴더가 생성된 것을 확인할 수 있다.


▶ 테이블 정보 열람하기

⊙ 집계함수

- 집계는 이미 계산된 것들을 모아서 계산하는 것을 말한다.

- SQL의 집계 함수에는 avg(), sum(), count() 등이 있다.

- 즉, 이미 계산된 결과를 어떤 기준으로 그룹화 하는 함수들이다.

- 그룹화하는 기준을 집계 키라고 하는데, GROUP BY 절의 칼럼이나 연산식을 집계 키로 사용할 수 있다.

- GROUP BY 절에 사용된 집계 키들만 SELECT 목록에 사용할 수 있다는 것이다. 그렇지 않으면 에러가 발생!

- 예를 들어, 쿼리 분석기에서 아래의 명령을 실행. 여기에서 member.bId는 테이블명.필드명으로 특정 필드를 가리키는 표현 방식


- 아래와 같이 SELECT 절에는 bId, bPass, bName, bMail이 있고 GROUP BY절에는 member.bId만 있을 경우에 에러가 발생한다.

- 왜냐하면 bPass, bName, bMail은 GROUP BY에서 사용하는 집계 키가 아니라서 SELECT 절에 사용할 수 없기 때문이다.


⊙ 테이블 명 획득

- GROUP BY 절이 어떤 칼럼을 기준으로 그룹을 만들 때 HAVING는 결과를 다시 한번 더 필터링 하는 역할을 한다.

- 이것은 GROUP BY 절에 대한 조건, 즉 일반적인 SELECT 절의 WHERE와 비슷하다.

- HAVING는 단독으로 쓰일 수 없으며 GROUP BY 절과 함께 사용되어야 한다.

- 이 점을 이용하여 다음과 같은 명령을 검색어로 입력하면 에러가 발생하는 것을 확인 할 수 있다.


- 에러는 'bbs.idx' 열이 집계 함수에 없고, GROUP BY 절이 없으므로 SELECT 목록에서 사용할 수 없다는 내용이다.

- 이 에러 메시지에는 bbs라는 테이블 명과, idx라는 필드명을 언급함으로써 중요한 정보를 노출하고 있다.


⊙ 필드 명 획득

- 이전에 획득한 테이블 명과 필드 명을 다시 이용하여 검색 쿼리문에서 사용하면 bbs 테이블에 있는 다른 필드 명도 알아낼 수 있다.


- 입력 값으로 group by 조건에 idx를 추가하였다.

- 이렇게 하면 집계 키에 idx가 있으므로 그 다음에 있는 tId를 볼 수 있다.

- 하지만 이것은 집계 키에 없으므로 bbs.tId를 사용할 수 없다는 에러를 발생시킨다.

- 이런 방식으로 계속해서 아래와 같이 반복하면 bbs 테이블의 전체 필드 명을 알 수 있다.


- 이 과정을 통해 bbs라는 테이블에 idx, tId, tName, tMail, tTitile, tContent, tFilename, tfilepath, tRead, tDate라는 10개의 열리 존재한다는 것을 알 수 있다.

- 로그인 페이지에도 위와 동일한 방식으로 테이블의 필드 명을 알아낼 수 있다.


- SQL 쿼리 분석기에서 로그인 페이지에 대해 위의 과정을 실행하여 결과를 확인해보자.

- 쿼리 분석기에는 에러가 발생해도 끝까지 실행하기 때문에 전체 에러 메시지를 확인할 수 있다.


- 결국, member 테이블에 idx, bId, bPass, bName, bPost, bAssr1, bAddr2, bPhone, bMail, bDate 열이 있으며 로그인 페이지에는 이것을 이용하여 쿼리를 하고 있다는 것을 짐작할 수 있다.


⊙ 필드 타입 획득

- 이제 UNION과 sum()함수를 이욯아여 필드 타입을 알아보자

- sum() 함수에는 숫자형만 사용할 수 있고 UNION을 사용하기 위해서는 두 테이블의 필드 수가 동일해야 한다.

- admin으로 로그인을 한 후 게시판 리스트 하단에 게시글을 검색하는 입력 폼에 테스트

- 아래의 board_search.asp 파일을 열어 확인해보면 검색어(Keyword)를 받아, Select * From bbs Where tTitle like '%keyword%'을 생성

- 쿼리문이 제대로 실행되면 제목에 keyword가 포함되어 있는 게시글을 찾아서 보여줄 것이다.


- 검색어에 union을 사용하여 member 테이블과 bbs 테이블의 필드 타입을 알아낼 수 있다.


- sum() 함수는 varchar 타입을 사용할 수 없기 때문에 에러가 발생하게 되고 bId가 varchar타입인 것을 알 수 있다.

- 동일한 방법으로 member 테이블의 bId, bPass, bName, bpost, bAddr1, bAddr2, bPhone, bMail과 bbs 테이블의 tId, tName, tMail, tTitle, tContent, tfilename, ffilepath가 varchar 타입을 사용한다는 것을 확인할 수 있다.


- 그리고 member.bDate와 bbs.tDate가 datetime 데이터 형식을 사용한다는 것도 확인하였다.

- 이제 member.idx와 bbs.idx, bbs.tRead만 확인하면 된다.

- 아래의 결과는 UNION에서 필드의 개수를 맞추지 않았기 때문에 에러가 발생했다는 것이며, 이는 데이터 형식에 대한 에러가 아니기 때문에 idx가 숫자형이라는 것을 유추할 수 있다.


- 실제 우리가 사용하는 테이블과 그 내용이 동일함을 알 수 있다.


member 테이블

bbs 테이블

필드 명

필드 타입

필드 명

필드 타입

idx

숫자

idx

숫자

bId

varchar

tId

varchar

bPass

varchar

tName

varchar

bName

varchar

tMail

varchar

bPost

varchar

tTitile

varchar

bAddr1

varchar

tContent

varchar

bAddr2

varchar

tfilename

varchar

bPhone

varchar

tfilepath

varchar

bMail

varchar

tRead

숫자

bDate

datetime

tDate

datetime


+ Recent posts